ROS Nodes: Subscribing and Checking Connections
In this section you will
access data from topics using a subscriber
learn more about handling messages
use the tool
rqt_graphfor introspection and debugging
In Write A Node, you learned how to write a simple node. While we learned how to publish data here, we still need to learn how to get access to data that is published within the ROS network. This is called subscribing to a topic.
Get Data from Topics
Robots typically have a lot of sensors that collect information about their environment. This data can then be published within ROS.
Our BlueROV has a pressure sensor.
In the following, we will explore how to access the pressure data and how to process it in order to get the BlueROV’s depth.
The output of the pressure sensor is published under the pressure topic inside the vehicle’s namespace.
So by default, the topic name will be /bluerov00/pressure.
Theoretically, we could use the setpoint_publisher.py and modify its code to subscribe to the pressure topic.
But to keep things modular and separated, we add a new node to the awesome_package.
Let’s name it depth_calculator.py.
You could argue that having a complete program to only calculate the depth coordinate of the vehicle from pressure data might seem like a bit overkill.
However, it is a good idea to solve separate problems in separate nodes.
Note
Keep in mind, you have to make every node executable! See Write A Node.
The source code of our node depth_calculator.py might look like this:
 1#!/usr/bin/env python3
 2import rclpy
 3
 4from hippo_msgs.msg import DepthStamped
 5from sensor_msgs.msg import FluidPressure
 6from rclpy.node import Node
 7
 8
 9class MySecondNode(Node):
10    def __init__(self):
11        super().__init__(node_name='my_second_node')
12
13        # Create publisher for the calculated depth.
14        self.depth_pub = self.create_publisher(DepthStamped, 'depth', 1)
15
16        # Create subscriber. The third argument is the function that processes
17        # the data. Every time fresh data is received, this function is called.
18        # Subscribers should always come last within the __init__ function!
19        self.pressure_sub = self.create_subscription(FluidPressure, 'pressure',
20                                                     self.on_pressure, 1)
21
22    def on_pressure(self, pressure_msg):
23        pascal_per_meter = 1.0e4
24        # Careful! You will have to do some additional thinking.
25        # What kind of pressure data do we get? Relative/absolute?
26        # What about the atmospheric pressure?
27
28        depth = -pressure_msg.fluid_pressure / pascal_per_meter
29
30        depth_msg = DepthStamped()
31        depth_msg.depth = depth
32        # let's add a timestamp:
33        now = self.get_clock().now()
34        depth_msg.header.stamp = now.to_msg()
35
36        self.depth_pub.publish(depth_msg)
37
38
39def main():
40    rclpy.init()
41    node = MySecondNode()
42    rclpy.spin(node)
43
44
45if __name__ == '__main__':
46    main()
Hint
Confused on how you should know what the structure of a FluidPressure message looks like and how to access its data?
Simply google “ros fluidpressure” and you will find the message definition. Message fields are accessed by a dot operator. Message definitions can be nested, too. The Header message within the FluidPressure message above is one example.
All hippo_msgs message definitions, such as the above-used DepthStamped message, are our own definitions.
You won’t find these online.
Instead, you can find the definition here: opt/ros/jazzy/share/hippo_msgs/msg/DepthStamped.msg.
More conveniently, you can always look up message definitions using the command line tool ros2 interface show.
For example
$ ros2 interface show hippo_msgs/msg/DepthStamped
will output:
std_msgs/Header header
         builtin_interfaces/Time stamp
            int32 sec
            uint32 nanosec
         string frame_id

float32 depth
float32 z_vel
float32 depth_covariance
float32 vel_covariance
We can add this node to our launchfile as follows:
 1from ament_index_python.packages import get_package_share_path
 2from launch_ros.actions import Node, PushRosNamespace
 3
 4from launch import LaunchDescription
 5from launch.actions import (
 6   DeclareLaunchArgument,
 7   GroupAction,
 8   IncludeLaunchDescription,
 9)
10from launch.launch_description_sources import PythonLaunchDescriptionSource
11from launch.substitutions import LaunchConfiguration
12
13
14def generate_launch_description() -> LaunchDescription:
15    launch_description = LaunchDescription()
16
17    arg = DeclareLaunchArgument('vehicle_name')
18    launch_description.add_action(arg)
19
20    setpoint_node = Node(executable='setpoint_publisher.py',
21                         package='awesome_package')
22    depth_node = Node(executable='depth_calculator.py',
23                      package='awesome_package')
24    group = GroupAction([
25       PushRosNamespace(LaunchConfiguration('vehicle_name')),
26       setpoint_node,
27       depth_node,
28    ])
29    launch_description.add_action(group)
30
31    package_path = get_package_share_path('fav')
32    launch_path = str(package_path / 'launch/simulation.launch.py')
33    source = PythonLaunchDescriptionSource(launch_path)
34    launch_args = {'vehicle_name': LaunchConfiguration('vehicle_name')}
35    action = IncludeLaunchDescription(source,
36                                     launch_arguments=launch_args.items())
37    launch_description.add_action(action)
38
39    return launch_description
And launch the setup:
$ ros2 launch awesome_package setpoint.launch.py vehicle_name:=my_name
Inspecting the Setup
So, our nodes are up and running. It will happen that things are not exactly working as they should, though.
In the following, we will check and inspect our setup. Are all nodes connected and interacting the way they should?
A very handy tool to inspect your setup is rqt_graph.
Open another terminal to run
$ rqt_graph
Make sure to uncheck Dead sinks and Leaf Topics. Also make sure Nodes/Topics (all) is selected in the upper left corner and refresh the view. This should yield a graph like
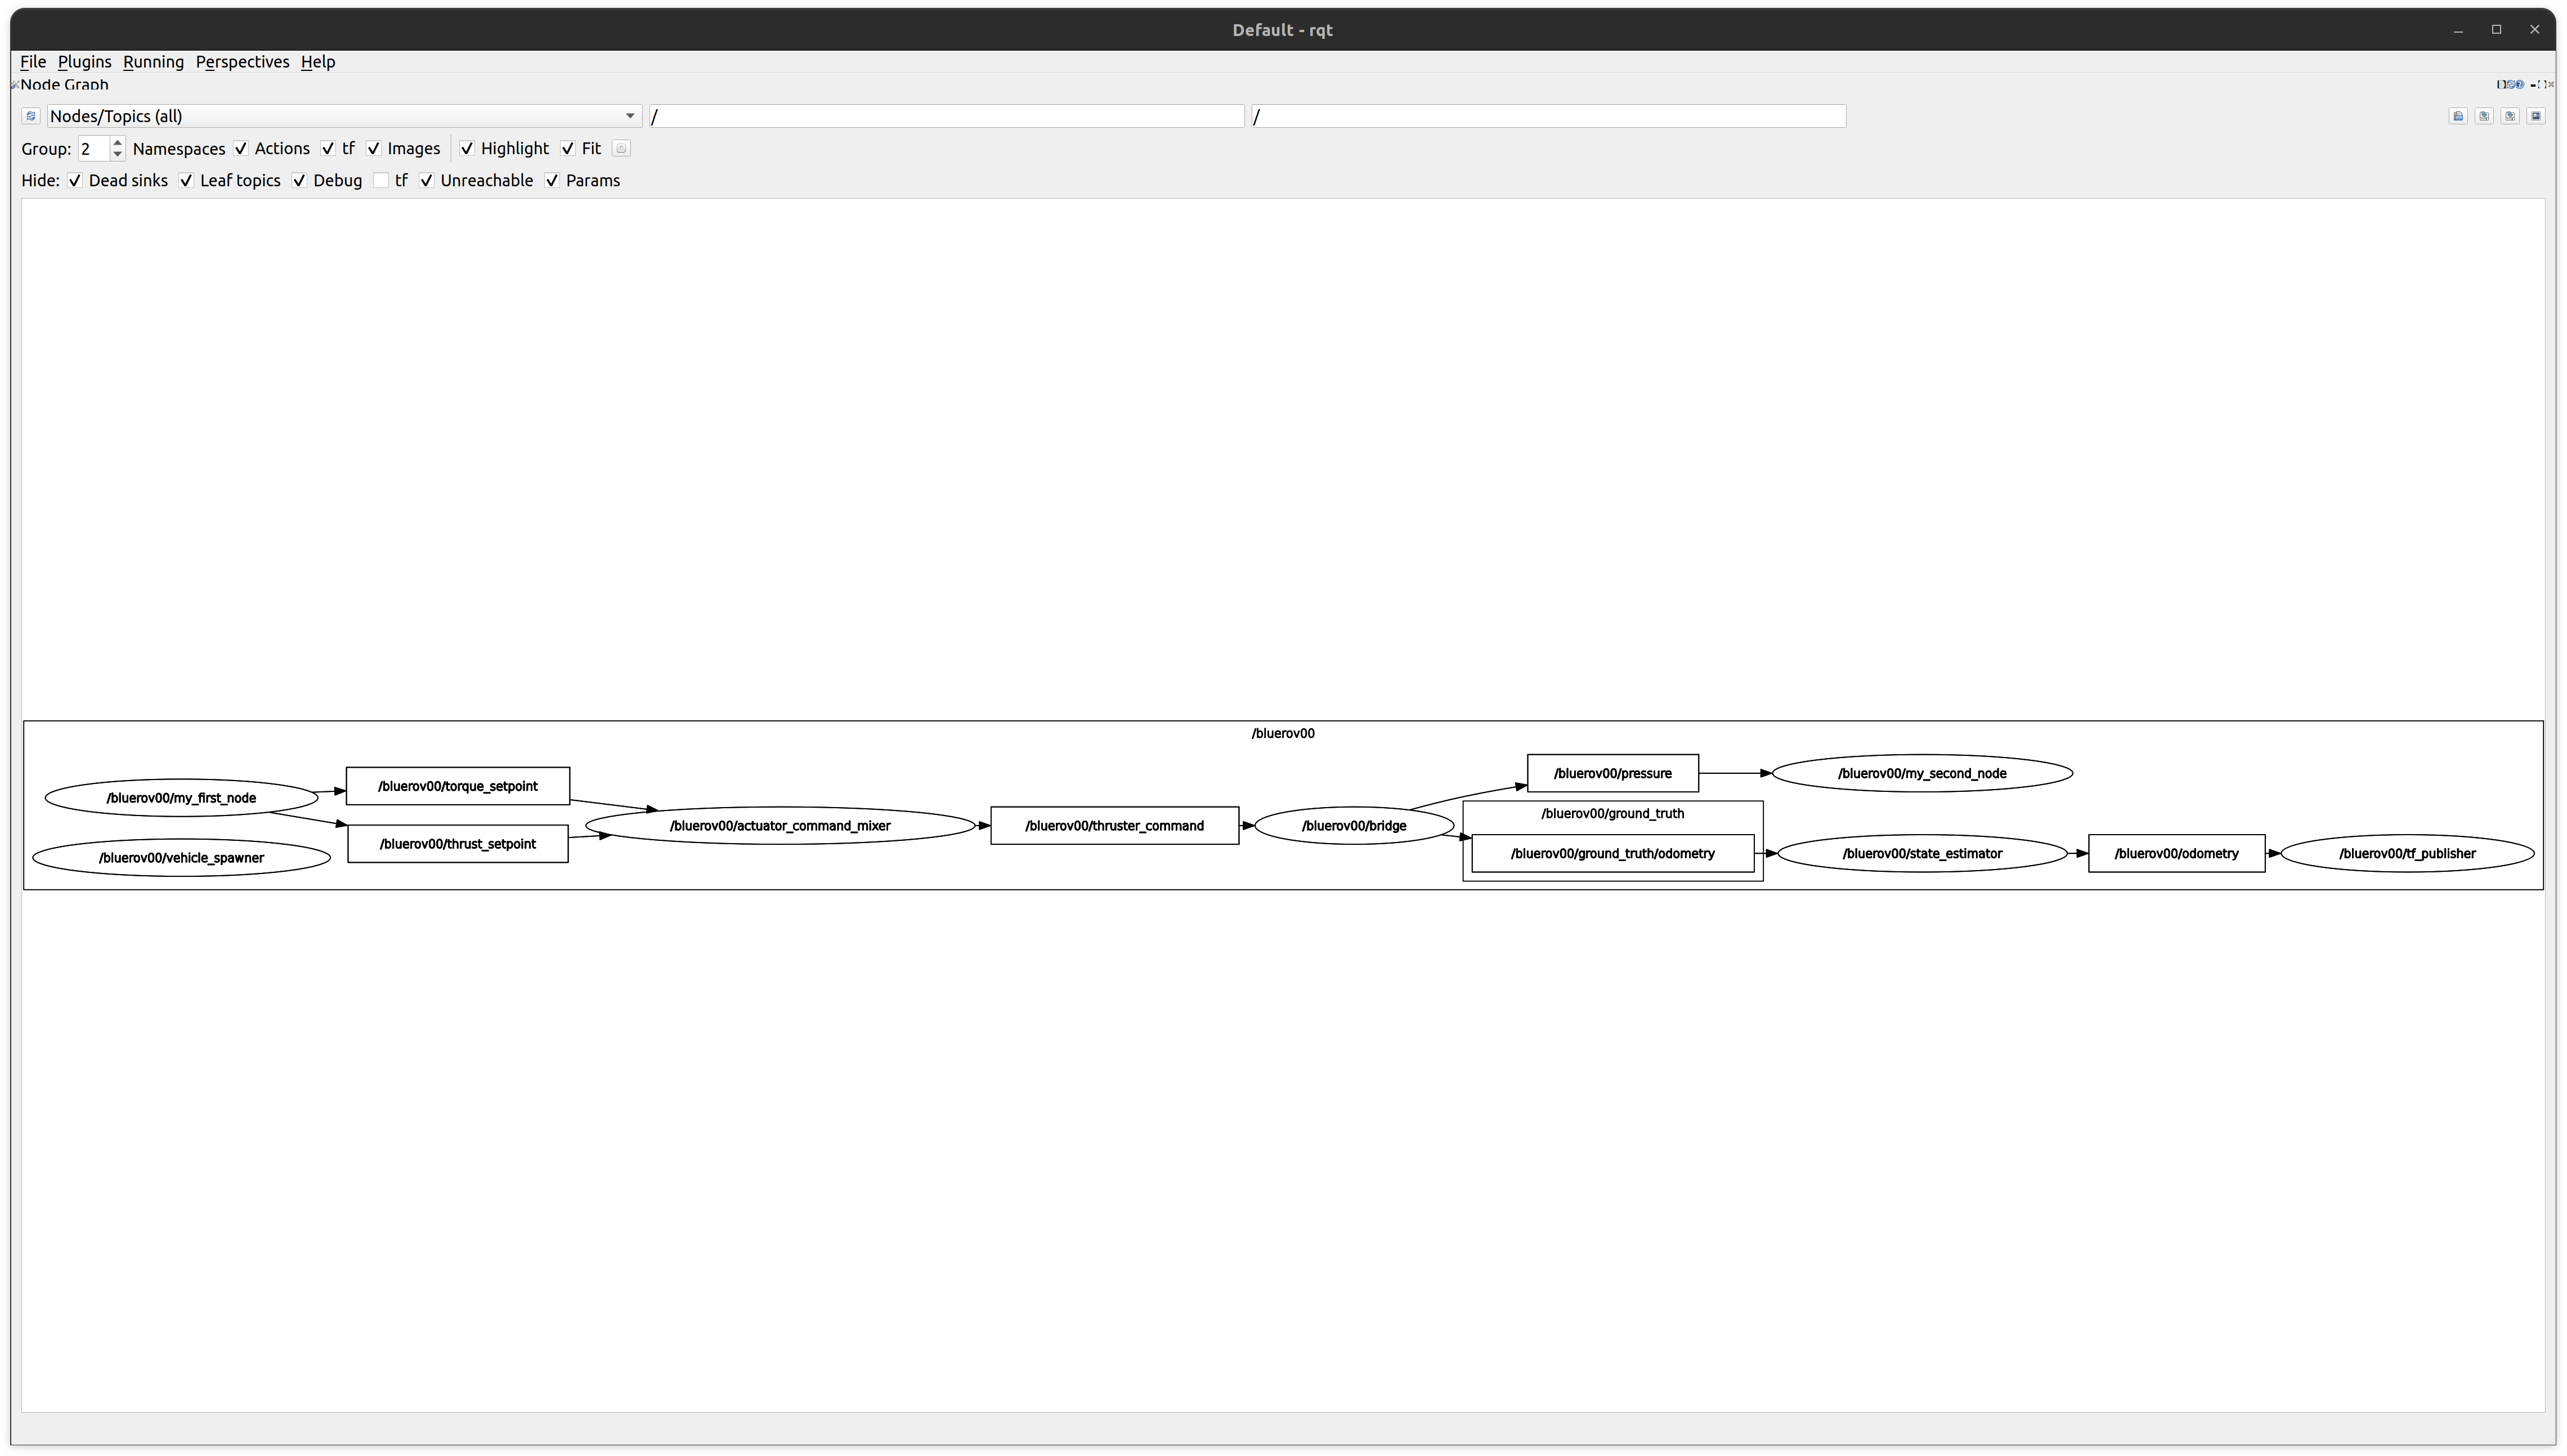
You can see the different nodes /bluerov00/my_first_node and /bluerov00/my_second_node.
We are not interested in a lot of the other nodes and will simply ignore them.
Nodes are displayed as ellipses and topics as rectangles.
Since all these nodes live inside the /bluerov00 namespace and use relative topic names, everything has the /bluerov00 prefix.
The bluerov00/bridge node is the interface between the (simulated in Gazebo) vehicle and our ROS domain.
On one hand, it receives the control commands that are then send to the thrusters.
On the other hand, it publishes sensor data, like the pressure sensor readings.
Regarding Control
We can send the following control setpoints to the bluerov00/actuator_mixer_node node:
Thrust setpoints: In the topic
bluerov00/thrust_setpointusing the message typehippo_msgs/ActuatorSetpoint, we can send our desired thrusts in x,y,z-direction of the BlueROV.Torque setpoints: Similarly, in the topic
bluerov00/torque_setpointusing the message typehippo_msgs/ActuatorSetpoint, we send the desired torques around the x,y,z-axis of the BlueROV.
That should be familiar to all of us from the previous tutorial and our dummy example with the setpoint_publisher.py.
The message definition can be looked up in /opt/ros/jazzy/share/hippo_control_msgs/msg/ActuatorSetpoint.msg and is:
std_msgs/Header header

bool ignore_x
bool ignore_y
bool ignore_z

float64 x # [N] or [rad/s] or dimensionless effort in range [-1;1]
float64 y # [N] or [rad/s] or dimensionless effort in range [-1;1]
float64 z # [N] or [rad/s] or dimensionless effort in range [-1;1]
We can ignore the bool ignore_x lines.
As an example, for full thrust in the x-direction of the BlueROV, we would publish a value of 1 for actuator_msg.x and 0 for y and z.
Regarding Sensor Data
We can see that the (simulated) pressure sensor’s data is also published by the bluerov00/bridge node.
Our depth calculator, here still called my_second_node, is connected to the sensor data!
Hooray!
However, we cannot say whether our calculations and their results actually look right… Next, we will learn how to plot data.