Install Ubuntu
This section should guide you through the process of installing Ubuntu alongisde Windows on your machine. If you prefer to install Ubuntu inside a Virtual Machine, you can skip this section and continue with Virtual Machine.
Attention
Since we are going to install a new/second operating system on your device, that might be a good opportunity to create a backup just in case anything goes wrong! We are not responsible for any damage or loss of data that might result from any of the following instructions.
Note
For those of you who have their windows encrypted with bitlocker you might have to enter your bitlocker key the next time you boot windows after you have installed Ubuntu. You should save your bitlocker key (you can find it here). Alternatively you can turn off bitlocker encryption.
Prepare Your Disk Partition
Resize your Windows partition. Hit Win + R and enter
diskmgmt.mscand click OK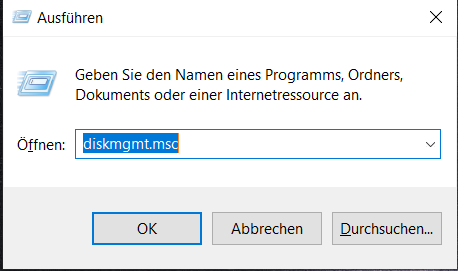
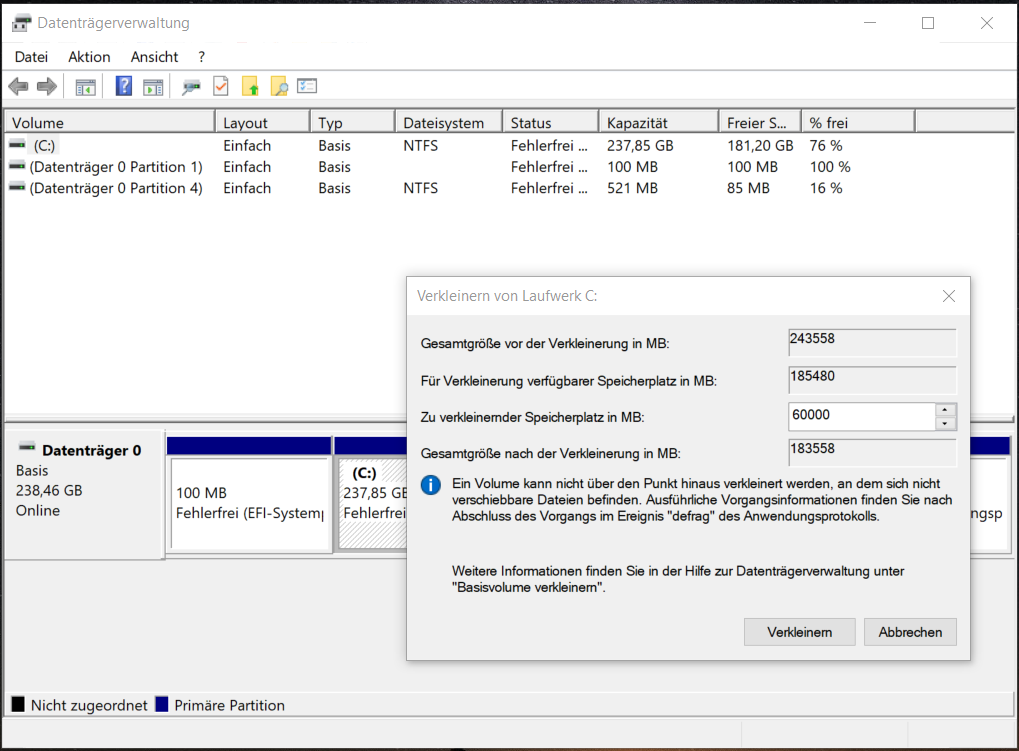
Choose the partition on which you want to install Ubuntu (in most cases this will be
(C:).Resize the partition to create unallocated space where we can install Ubuntu. 30GB of free space might be enough for Ubuntu, but we recommend at least 60GB if you can afford it.
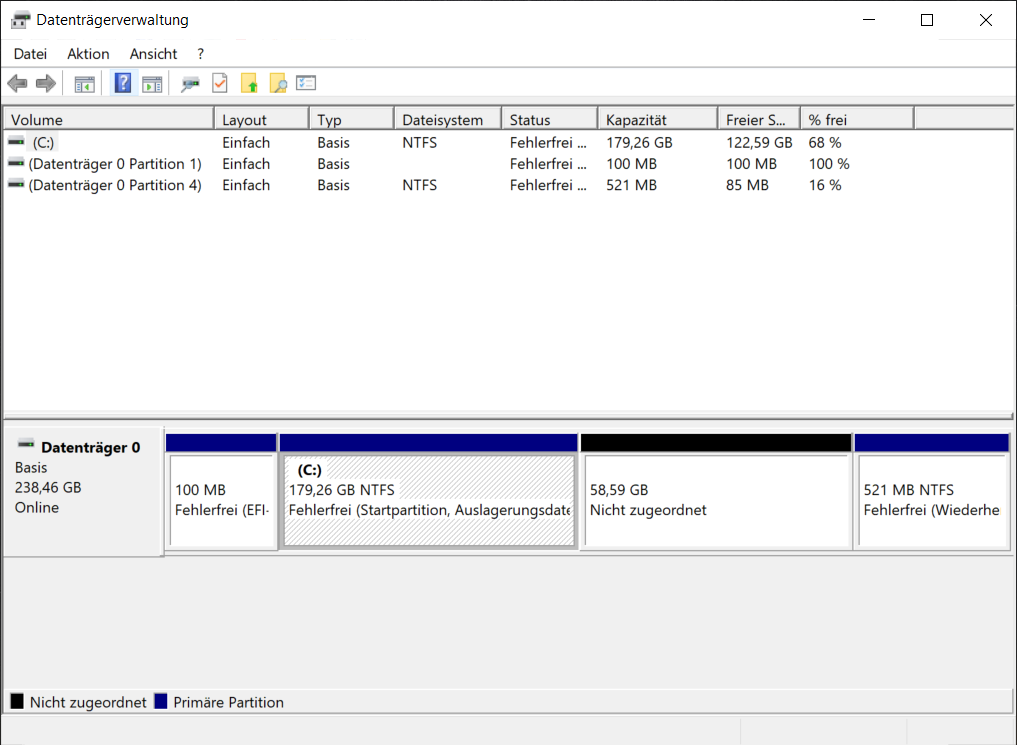
The result could look similiar to this:
Create A Bootable USB stick
Download Ubuntu 24.04 Desktop from the offical Website.
Download Etcher.
Insert an USB stick with at least 4GB of memory.
Start Etcher and select the downloaded Ubuntu image and the inserted USB device as target.

Make sure you really selected the correct target. Otherwise all your data on the wrongly selected target might get deleted.
Click Flash!.
Disable Fast Startup
If you want to access your Windows partition from inside Ubuntu, you need to disable Windows’ Fast Startup. Follow these instructions, if you want to do so.
Disable Secure Boot
Reboot your system after flashing is done and enter your BIOS/UEFI during Bootup. To do so, you have to hit a certain key, depending on your hardware. For Dell commputers you probably need to hit F12 during the DELL splashscreen. For Lenovo, this key is Enter. This opens a dialog where you can choose to enter your BIOS settings.
Find the settings to disable Secure Boot, save your changes and exit the BIOS/UEFI.
Boot From Ubuntu USB Stick
Reboot and select the medium you want to boot from during the splashscreen (again F12 for Dell or Enter for Lenovo). Now you want to boot from the Ubuntu USB stick.
In the Grub menu, choose
Ubuntu(probably the first option). This will boot Ubuntu from the USB stick after a quick file system check.
Start The Installation Wizard
Once booted, you will get the option to either
Try UbuntuorInstall Ubuntuimmediately. If you decide to try Ubuntu before installing, you will find an icon for installing Ubuntu on the desktop. Double click it to launch the installation wizard. If you don’t want to try Ubuntu first, you can click onInstall Ubuntuto start the installation wizard.We highly recommend setting the language to English.
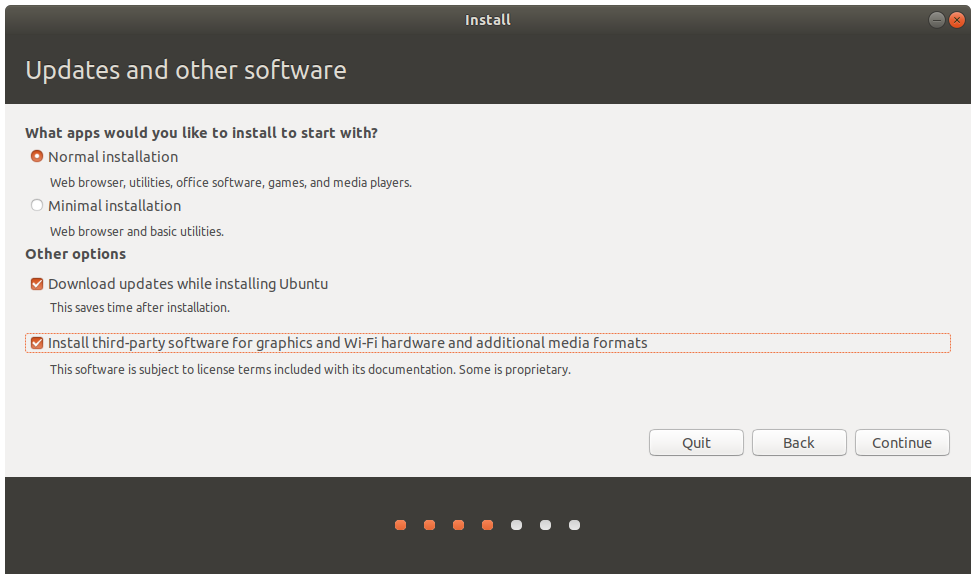
Choose the option to install additional drivers. It is also a good idea to connect to a nearby WiFi or Ethernet.
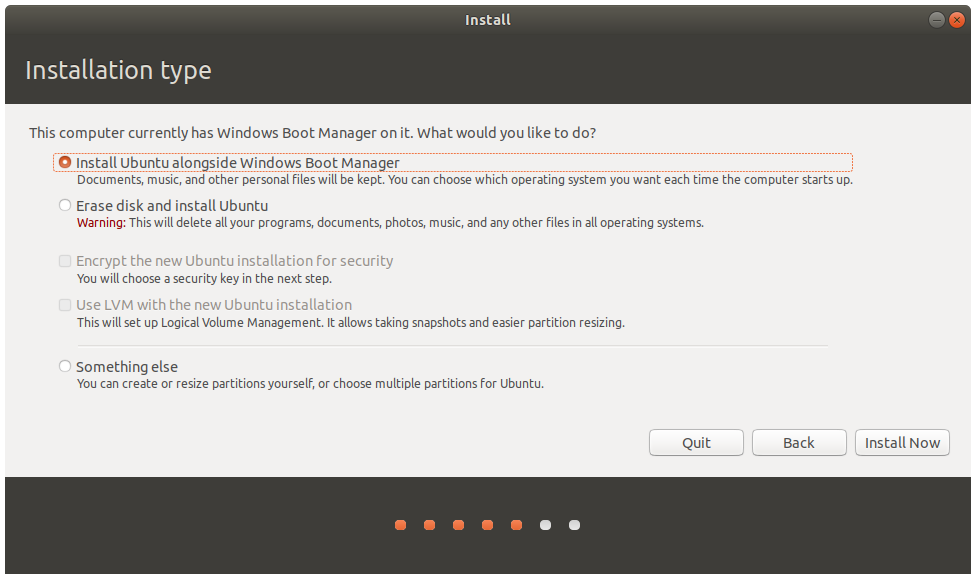
In the last step of the installation, the wizard asks you if you want to install Ubuntu alongside windows because it detects your windows installation and the free disk space we created before. Choose this option and click Install Now.
Warning
Do NOT choose the Erase disk and install Ubuntu option! This will delete your Windows installation!
Reboot.
You should now have a running Ubuntu version on your laptop!
This is the time to check that your Windows partition still runs, too. As mentioned at the beginning, you might be asked for the bitlocker key when booting Windows again for the first time.
Some Convenience Features
Note
The following is optional, just some tips/fixes for your convenience.
Now that your dual-boot is set up, you might notice a few changes.
When booting, you will see the Grub menu. By default, Ubuntu is the first option. If you are mostly using Windows in your daily life, this can become tedious. It’s easy to not react quickly enough and to end up booting Ubuntu by accident. Ending up in the seemingly endless rebooting cycle…
While (hopefully!) you will spend a lot of time using Ubuntu this semester, the following explains how to change this back to Windows as the default.
Open the Grub configuration file (for editing this, you need to open with sudo)
$ sudo gedit /etc/default/grub
A window should open with contents similar to this:
 1# If you change this file, run 'update-grub' afterwards to update
 2# /boot/grub/grub.cfg.
 3# For full documentation of the options in this file, see:
 4#   info -f grub -n 'Simple configuration'
 5
 6GRUB_DEFAULT=0
 7GRUB_TIMEOUT_STYLE=hidden
 8GRUB_TIMEOUT=10
 9GRUB_DISTRIBUTOR=`lsb_release -i -s 2> /dev/null || echo Debian`
10GRUB_CMDLINE_LINUX_DEFAULT="quiet splash"
11GRUB_CMDLINE_LINUX=""
12
13# Uncomment to enable BadRAM filtering, modify to suit your needs
14# This works with Linux (no patch required) and with any kernel that obtains
15# the memory map information from GRUB (GNU Mach, kernel of FreeBSD ...)
16#GRUB_BADRAM="0x01234567,0xfefefefe,0x89abcdef,0xefefefef"
17
18# Uncomment to disable graphical terminal (grub-pc only)
19#GRUB_TERMINAL=console
20
21# The resolution used on graphical terminal
22# note that you can use only modes which your graphic card supports via VBE
23# you can see them in real GRUB with the command `vbeinfo'
24#GRUB_GFXMODE=640x480
25
26# Uncomment if you don't want GRUB to pass "root=UUID=xxx" parameter to Linux
27#GRUB_DISABLE_LINUX_UUID=true
28
29# Uncomment to disable generation of recovery mode menu entries
30#GRUB_DISABLE_RECOVERY="true"
31
32# Uncomment to get a beep at grub start
33#GRUB_INIT_TUNE="480 440 1"
Find the line setting the GRUB_DEFAULT, highlighted above. Setting this to 0 means that in the Grub menu, the very first option will be the default.
Set this to the number of the Windows option in your Grub menu (starting to count from 0!) You will have to look this up again, but it is likely that Windows is the third option (i.e. GRUB_DEFAULT = 2).
Change the correct line in your configuration file.
After changing this file, update your configuration:
$ update-grub
Finally, you might notice a wrong time displayed when switching between Windows and Ubuntu.
In order to fix this, in Ubuntu, simply run
$ timedatectl set-local-rtc 1