Workspace Setup
Create the Structure
$ mkdir -p ~/fav/ros2/src
In ROS, we put the code we write (or use) in so-called “workspaces”. We can have multiple workspaces and can either use them in combination by “overlaying” the workspaces. Or we can have them as completely independent setups and use only a certain selection of them at a time. This devision is done mainly because of time saving reasons.
For convenience, we only use one workspace ros2 for this class, which is our development workspace. We put all the packages/code developed during this class here.
Note
The setup normally includes three steps:
downloading the code of the packages we want from e.g. github
building the code
sourcing the workspace, so that the built packages can be found by your machine and executed.
The process of building the code can be pretty time consuming. So, sometimes it can be beneficial to skip this step by using pre-built packages.
The installation of the pre-built packages
Adding the key
$ sudo curl https://repositories.hippocampus-robotics.net/hippo-archive.key -o /etc/apt/keyrings/hippocampus-robotics.asc
Adding the sources
$ echo "deb [arch=$(dpkg --print-architecture) signed-by=/etc/apt/keyrings/hippocampus-robotics.asc] https://repositories.hippocampus-robotics.net/ubuntu $(. /etc/os-release && echo $UBUNTU_CODENAME) main" | sudo tee /etc/apt/sources.list.d/hippocampus.list
Updating
.apt$ sudo apt update
Add keys for
rosdep, so it knows that our packages can be resolved viaapt install ros-$ROS_DISTRO-<pkg-name>.$ echo "yaml https://raw.githubusercontent.com/HippoCampusRobotics/hippo_infrastructure/main/rosdep-${ROS_DISTRO}.yaml" | sudo tee /etc/ros/rosdep/sources.list.d/50-hippocampus-packages.list
Apply the changes
$ rosdep update
Installation
$ sudo apt install ros-jazzy-hippo-full
“ros2” workspace
Now on to our development workspace
Populate “ros2” workspace by downloading the code
$ cd ~/fav/ros2/src \
&& git clone https://github.com/FormulasAndVehicles/fav.git
Build “ros2” workspace
Creating some short aliases for inconveniently long commands:
$ echo "alias build_ros=\"env -i HOME=\$HOME USER=\$USER TERM=xterm-256color zsh -l -c 'source /opt/ros/jazzy/setup.zsh && cd \$HOME/fav/ros2 && colcon build --symlink-install --cmake-args --no-warn-unused-cli -DCMAKE_EXPORT_COMPILE_COMMANDS=ON'\"" >> ~/.zshrc
$ source ~/.zshrc
$ echo "alias rosdep-ros2=\"env -i HOME=\$HOME USER=\$USER TERM=xterm-256color bash -l -c 'source /opt/ros/jazzy/setup.bash && cd \$HOME/fav/ros2 && rosdep install --from-paths src -y --ignore-src'\"" >> ~/.zshrc
$ source ~/.zshrc
Make sure dependencies are installed
$ rosdep-ros2Build the workspace (this may take some time!):
$ build_rosSource “ros2” workspace
$ echo 'source "$HOME/fav/ros2/install/local_setup.zsh"' >> ~/.zshrc \
&& . ~/.zshrc
Check .zshrc file
Note
The mysterious .zshrc file is used to set environment variables.
Everyone sometimes makes typos or errors while adding stuff to this .zshrc file. You might open a new terminal and get an error as follows on the top:
bash: /...[file path+name]: no such file or directory
In case you echo (aka write) a wrong line into the .zshrc file, you can delete this line by opening the file in your favorite text editor. For example, using gedit as text editor:
$ gedit ~/.zshrc
The file should open in a new window. The command echo adds lines to the end of the file. Therefore, scroll to the bottom and find what you’ve added. Delete the lines that cause errors and save the changes.
Open the .zshrc file, for example using gedit as text editor:
$ gedit ~/.zshrc
Attention
Your ~/.zshrc should look like this this for the last lines:
...

alias build_ros="env -i HOME=$HOME USER=$USER TERM=xterm-256color zsh -l -c 'source /opt/ros/jazzy/setup.zsh && cd $HOME/fav/ros2 && colcon build --symlink-install --cmake-args --no-warn-unused-cli -DCMAKE_EXPORT_COMPILE_COMMANDS=ON'"
alias rosdep-ros2="env -i HOME=$HOME USER=$USER TERM=xterm-256color bash -l -c 'source /opt/ros/jazzy/setup.bash && cd $HOME/fav/ros2 && rosdep install --from-paths src -y --ignore-src'"
source $HOME/fav/ros2/install/local_setup.zsh
Final Check
Are we sure that everything is prepared correctly? Let’s check it!
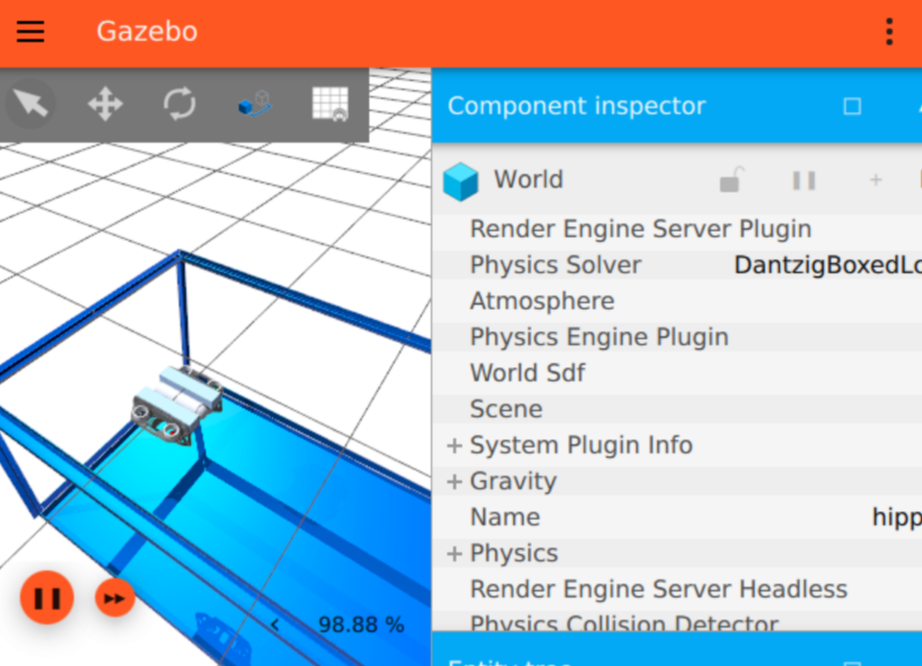
$ ros2 launch fav simulation.launch.py vehicle_name:=bluerov00
If a window similar to the following opens, we are on the right track
Note
If you are experiencing any difficulties, multiple warnings and errors appear within the terminal and gazebo dies after a few seconds, take a look at the troubleshooting section: I cannot start the simulation!
If things still do not work out as you hoped, please read the terminal output carefully and check for errors. If you cannot figure out the problem yourself, send a copy of the complete output to your favourite research associate. Preferably via Slack. And use the code-block function there (Ctrl + Alt + Shift + C). This really helps us to help you!